- Preface
- Markup Languages – A Definition and Some History
- Beginning HTML
- HTML Lists
- HTML Tables
- HTML - Color, Fonts and Special Characters
- HTML Links
- HTML Images
- HTML Frames
- Cascading Style Sheets
- MicroSoft PhotoDraw
- JavaScript
- HTML Forms and Form Handling
- VBScript
- MicroSoft FrontPage
- Active Server Pages
- Java Applets
- XML Meaning and More
- Macromedia Flash 5.0
- References
|
Tables are another way to present information in an organized fashion. Tables can also be used to format a webpage. See the section on images for an example of how a table can be used to structure the appearance of a webpage.
5.1 A Standard Table
A table definition is contained within table beginning and closing tags,
<TABLE> … </TABLE>. After the beginning table tag, the rows
of the table are defined with the table row beginning and ending tags,
<TR> … </TR>. Within each set of table row tags, each data element
(or column) is defined using the table data tags, <TD> … </TD>. In between
the table data tags is the content of that cell of the table. Since table definitions can be quite
complicated, it is often useful to include comments as is done in the example below.
Comments are ignored by the browser. Comments go within angle brackets, just as tags do,
but have an exclamation point after the first angle bracket.
- Add the following to your HTML file:
<TABLE>
<! Row 1>
<TR>
	<TD>Semester </TD>
	<TD> Course </TD>
	<TD> Comments </TD>
	<TD> Credits </TD>
</TR>
<! Row 2>
<TR>
	<TD>Fall 2001 </TD>
	<TD>PL 100 First Philosophy <BR>
		MA 109 Calculus I <BR>
		EN 102 Language and Rhetoric
	</TD>
	<TD> None<BR>
		I barely survived this class.<BR>
		None<BR>
	</TD>
	<TD>
		3 <BR>
		3 <BR>
		3 <BR>
	</TD>
</TR>
<!Row 3>
<TR>
	<TD>Spring 2002
	</TD>
	<TD>CS110 Intro to C++ <BR>
		BL 101 Intro to Plant Life <BR>
		HI 102 Early US History
	</TD>
	<TD> None<BR>
		I loved this class. <BR>
		None<BR>
	</TD>
	<TD>
		3 <BR>
		3 <BR>
		3 <BR>
	</TD>
</TR>
</TABLE>
It should appear as follows:
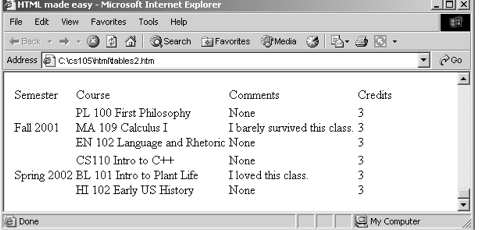
- There are a number of things to note about this table.
First, note that there are no lines separating each cell and that the text of one cell is
right up against the text in the next cell of the same row, in some cases.
Second, note how the text in each cell is centered vertically, and aligned to the left horizontally.
Third, notice that the column headings have the same appearance as all of the information in the table.
It would be nice if these headings appeared different than the data in the table.
Let’s address some of these issues now
5.2 Table Column Headings
- First, let’s address the appearance of the column headings.
There is another tag that can be used at the beginning of a table to define headings for the columns.
This set of tags is called the table heading tags, <TH> … </TH>. The text between table
heading tags will appear in bold print and will be centered within the table cell. Replace the table
data tags <TD> … </TD> in the first row with table heading tags so that the first row
of the table now looks like this:
<!Row 1>
<TR>
	<TH>Semester </TH>
	<TH>Course </TH>
	<TH>Comments </TH>
	<TH>Credits </TH>
</TR>
5.3 Table Gridlines
- Next, let’s take care of the lack of gridlines in the table. While we are at it,
let’s also add some color to the background of the table so that is even more distinct
from the rest of the HTML page. We can do this by using some of the attributes available
for the table tag. The BGCOLOR tag sets the background color of the table. Colors will
be addressed in more detail in another section. The BORDER tag sets the width (in pixels)
of the outside border of the table. By specifying a border, the grid lines also appear.
Change the beginning table tag from <TABLE> to the following:
<TABLE BGCOLOR = #EEEEEE BORDER = 1>
- Save your file and view it in a browser.
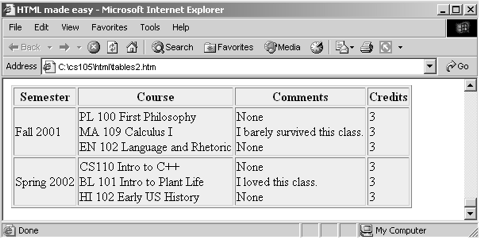
5.4 Table Captions
- Another set of tags available for use inside table tags is the CAPTION tag,
<CAPTION> … </CAPTION>. This tag will place a caption or title above the table.
Add the following line below the beginning table tag:
<CAPTION>Courses I have taken </CAPTION>
- Note that the caption appears centered above the table. The caption tag can use an
ALIGN attribute with a value of “BOTTOM”. Adding this attribute and value will place the
caption below the table instead of above. An example of the code to this point is below
followed by how it should appear in a browser.
<TABLE BGCOLOR = #EEEEEE BORDER = 1 >
<CAPTION>Courses I have taken </CAPTION>
<! Row 1>
<TR>
	<TH> Semester </TH>
	<TH> Course </TH>
	<TH> Comments </TH>
	<TH> Credits </TH>
</TR>
<!Row 2>
<TR>
	<TD> Fall 2001 </TD>
	<TD>PL 100 First Philosophy <BR>
			MA 109 Calculus I  <BR>
			EN 102 Language and Rhetoric
	</TD>
	<TD> None<BR>
			I barely survived this class.<BR>
			None<BR>
	</TD>
	<TD> 3 <BR>
			3  <BR>
			3  <BR>
	</TD>
</TR>
<!Row  3>
<TR>
	<TD> Spring 2002 </TD>
	<TD> CS110 Intro to C++ <BR>
		BL 101 Intro to Plant Life <BR>
		HI 102 Early US History
	</TD>
	<TD> None<BR>
		I loved this class. <BR>
		None<BR>
	</TD>
	<TD> 3 <BR>
			3 <BR>
			3 <BR>
	</TD>
</TR>
</TABLE>
|
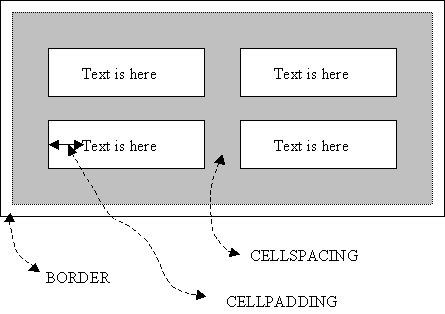
5.5 Table Cell Spacing, Padding, Alignment and Background Color
- As we saw above, specifying a border for the table, also added grid lines to separate
each of the cells of the table. The value for the border is expressed in number of pixels.
The larger the number of pixels assigned to the border attribute is, the wider the border around the table will be.
As the border gets wider, a beveled effect is added to the border which gives the table a three dimensional appearance.
However, no matter how wide the border is, the width of the gridlines defaults to 1 pixel. The width of the gridlines is
called the cellspacing. The CELLSPACING attribute can be assigned a different number of pixels in order to increase
the width of the gridlines between the cells of the table. We also noted that the text within the cells in the first version
of the table was right up against the next cell in the same row of the table. The CELLPADDING attribute allows us to
specify a number of pixels to be placed between the edge of the cell and the text. The cellpadding can be thought of as a
margin between the edge of the cell and the text. See the figure below that describes the difference between the border,
cellspacing and cellpadding of a table.
- Change the value of the BORDER attribute for the table from 1 to 10.
Save the file and view it in a browser. Note the beveled, 3D effect on the border
and that the gridline size remained the same.
- Add the CELLSPACING attribute with a value of 5. The beginning table tag should now appear as follows:
<TABLE BGCOLOR = #EEEEEE BORDER = 10 CELLSPACING = 5>
- Save the file and view it in a browser. Note the increased width of the gridlines.
- Next, add the CELLPADDING attribute with a value of 5 to the beginning table tag.
Save the file and view it in a browser. Note the increase in the space between the gridlines and the text of each cell.
The horizontal and vertical alignment of the text inside the cells can be adjusted at the cell (<TD>), the heading (<<TH>)
or the row (<TR>) level. The default horizontal alignment for heading cells is centered and the default
horizontal alignment for data cells is left justified. The attribute for the horizontal alignment is ALIGN.
The values for the ALIGN attribute are “LEFT”, “RIGHT”, “CENTER” and “JUSTIFY”.
The default vertical alignment of text can also be changed from the default value of MIDDLE using the
VALIGN attribute for cells (<TD>), headings (<TH>) or rows (<TR>).
The values for the VALIGN attribute are “MIDDLE”, “TOP” and “BOTTOM”.
- Change the horizontal alignment of the credit data cells to “CENTER” by changing the table data tags for both cells containing three 3s from <TD> to
<TD ALIGN = “CENTER”>.
- Change the vertical alignment of the cells containing the semester data by changing the table data tags for these cells from <TD> to
<TD VALIGN = “TOP”>
- Save the file and view the changes in a browser.
- The final aspects of HTML tables that will be covered in this tutorial is the ability to make a cell span more
than one row or more than one column. The attributes ROWSPAN and COLSPAN can be added to table data tags (<TD>)
in order to provide these effects. Examine the HTML code for the following table:
<TABLE BGCOLOR=#EEEEEE BORDER=10 CELLSPACING=5 CELLPADDING = 5>
<CAPTION ALIGN = BOTTOM>
	Completely Fictitious Survey Results
</CAPTION>
<! Row 1>
<TR>
	<TH BGCOLOR = #FFFFFF ROWSPAN = 2 COLSPAN = 2>
	% positive comments </TH>
	<TH COLSPAN = 3> COURSE
	</TH>
</TR>
<! Row 2>
<TR>
	<TH> English Composition
	</TH>
	<TH> Calculus I
	</TH>
	<TH> Intro to C++ <
	/TH>
</TR>
<!Row 3>
<TR>
	<TD VALIGN = "CENTER" ROWSPAN = 2>
	Gender	</TD>
	<TD BGCOLOR = lightblue> MALE
	</TD>
	<TD> 35%
	</TD>
	<TD> 65%
	</TD>
	<TD> 65%
	</TD>
</TR>
<!Row 4>
<TR>
	<TD BGCOLOR = pink> FEMALE
	</TD>
	<TD> 65%
	</TD>
	<TD> 85%
	</TD>
	<TD> 85%
	</TD>
</TR>
</TABLE>
|
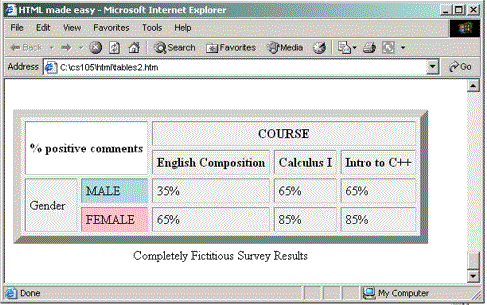
- Add this table to your HTML file, save it and view it in a browser. Now, let’s examine the code and the results.
- Notice that the first cell in the table, as well as the MALE and FEMALE data cells have different background colors than the other cells of the table. This is accomplished by adding a BGCOLOR attribute to those table header and table data tags. Colors will be discussed in more detail in a later section of this tutorial.
- Notice that the first cell of the table spans two rows and two columns. This is accomplished using both the ROWSPAN and COLSPAN attributes in the table heading tag.
- Note that Row 2 (the row containing the names of the courses) does not start at the left edge of the table, but rather starts after the first cell of the first row.
- Note that Row 4 (the row beginning with “FEMALE”) does not start at the left edge of the table, but rather starts after the first cell of the third row.
References
- A Beginner's Guide to HTML
http://archive.ncsa.uiuc.edu/General/Internet/WWW/HTMLPrimerPrintable.html
- HTML: A Guide For Beginners
http://www.geocities.com/Baja/4361/index.html
- HTML: An interactive guide for beginners.
http://www.davesite.com/webstation/html/
- HTML and XHTML Information
www.w3c.org/markup
- HTML reference including browser suppport
http://www.w3schools.com/html/html_reference.asp
- W3Schools HTML Tutorials
http://www.w3schools.com/default.asp
- Willcam’s Comprehensive HTML Cross Reference
http://www.willcam.com/cmat/html/crossref.html
- Anderson-Freed, S. (2002) Weaving a Website: Programming in HTML, Javascript, Perl and Java. Prentice-Hall:NJ. ISBN 0-13-028220-0
|